How to Share Data Between Components in Angular

When we build components in an application, we maybe need to share or send data from parent to child without a direct connection.
👉🏽 Why pay for hosting? Click here to deploy your Angular apps for free on a reliable VPS
Angular provides different these ways to communicate components:
-
Input() and Output() decorators.
-
Viewchild decorator.
-
Behavior Subject with Rxjs.
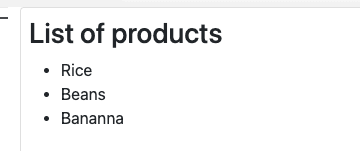
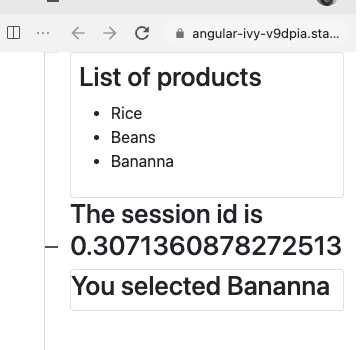
We use these ways to share data between two components, show a list of products, and get the selected product name in another component when the user clicks on it.
-
The *list-products.component *renders the products provided from parent to child.
-
The *app.component * shows the product selected.
Feel free to play with the final code https://angular-ivy-v9dpia.stackblitz.io
Using Input and Output decorators.
The input decorators allow us to get data from parent components quickly, edit the list-product.component.ts using the @Input() decorator, and declare the productList property.
import { Component, Input, OnInit } from '@angular/core';

export class ProductListComponent {
  @Input() productList = [];

}
Update the HTML to render the list of products using the *ngFor directive.
 <li *ngFor="let product of productList">
    {{ product.name }}
  </li>
Learn more about *ngFor directive.
Second, the app.component.ts declares the products variable with the list of products to be shown.
export class AppComponent {
  products = [
    { name: 'Rice', id: 1, price: 200 },
    { name: 'Beans', id: 2, price: 300 },
    { name: 'Bananna', id: 3, price: 400 },
  ];
Edit the app.component.html and use [productList] to pass the data to the list-product component.
  <app-product-list
    class="card p-2"
    [productList]="products"
  ></app-product-list>
Learn more Property binding

Good, We are using the Input() decorator and sending data from parent to child, the next step is to get the selected product from the child component and read it from the parent.
Getting the selected product from the child component.
Using a combination of @Output() decorators and EventEmmiter, we can share the information with the parent.
Edit product-list.component and declareonSelected property using the @Ouput decorator and EventEmitter type.
Create a new method to the onSelectedProduct method that gets a product using the onSelected event emitter to emit the selected value.
Read more about event emitter
import { Component, EventEmitter, Input, OnInit, Output } from '@angular/core';

@Component({
  selector: 'app-product-list',
  templateUrl: './product-list.component.html',
  styleUrls: ['./product-list.component.css'],
})
export class ProductListComponent implements OnInit {
  @Input() productList = [];
  @Output() onSelected = new EventEmitter<any>();
  constructor() {}

  onSelectedProduct(product) {
    console.log(product);
    this.onSelected.emit(product);
  }
}
Edit the product-list.component.html, listen to the click event, on it call the onSelectedProduct method.
<li *ngFor="let product of productList" (click)="onSelectedProduct(product)">
    {{ product.name }}
  </li>
Next, edit the app.component and create a new method for handling the event onSelected and assign it to internal property selectedProduct.
import { Component } from '@angular/core';

@Component({
  selector: 'my-app',
  templateUrl: './app.component.html',
  styleUrls: ['./app.component.css'],
})
export class AppComponent {
  selectedProduct: any;
  products = [
    { name: 'Rice', id: 1, price: 200 },
    { name: 'Beans', id: 2, price: 300 },
    { name: 'Bananna', id: 3, price: 400 },
  ];

  onSelectedProduct(product) {
    this.selectedProduct = product;
  }
}
Edit the app.component.html and subscribe to listen to the (onSelected) event and assign the onSelectedProduct passing the $event.
We show the selected product using a *ngIf for the selectedProduct property.
  <app-product-list
    class="card p-2"
    [productList]="products"
    (onSelected)="onSelectedProduct($event)"
  ></app-product-list>
 <div *ngIf="selectedProduct" class="card">
    <h1>You selected {{ selectedProduct.name }}</h1>
  </div>
Learn more list [events in angular](https://angular.io/guide/event-binding
Get access using ViewChild
Sometimes we want to access properties and functions from the child component. The ViewChild decorator allows us to inject one component into another and access it.
The injected component won't be ready until the afterViewInit lifecycle starts.
First, create a new property into de product-list.component.ts sessionId and set the value as Math.random().
export class ProductListComponent implements OnInit {
  sessionId = Math.random();
Read more about ViewChild.
Edit the app.component.ts, declare a new property sessionId, using the ViewChild decorator, passing the ProductListComponent.
export class AppComponent implements AfterViewInit {
  @ViewChild(ProductListComponent) productList;
  sessionId: any;
Next, implement the AfterViewInit lifecycle and assign the sessionId from ProductListComponent to the app.component sessionId.
 ngAfterViewInit() {
    this.sessionId = this.productList.sessionId;
  }
Read more about AfterViewInit
Into the app.component.html, show the sessionId
<h1>The session id is {{ sessionId }}</h1>Done! We got access to the ProductList component properties and attributes.
Using Service with Behavior Subject.
The before solutions work well. We can deliver our code but slightly lack the direct link between parent and child. What happens if we have more than three deep components?
Another good solution is to use a service to share data between components to sync the actual data. Rxjs with BehaviorSubject gives us the power to communicate components with extra points.
-
Not a problem with updated data (for example, the ViewChild gets the data on the AfterView lifecycle, to keep sync, it may use extra stuff, like DetectChanges, etc.).
-
The components using the service get the updated data.
-
No relation required like a child or nested components is a problem.
First, create a service product-service with the property a product$ field behavior subject to keep the product's value and declare a variable selectedProduct as observable from the product behavior subject.
Next, create a new method, setProduct, to set the selected product and update the behavior.
import { Injectable } from '@angular/core';
import { BehaviorSubject } from 'rxjs';

@Injectable()
export class ProductService {
  private product$ = new BehaviorSubject<any>({});
  selectedProduct$ = this.product$.asObservable();

  setProduct(product: any) {
    this.product$.next(product);
  }
}
Read more about behavior subject
Next, the component injects the product service into the app, subscribes to the selectedProduct observable, and the value from it assigns to the selectedProduct field.
 constructor(private productService: ProductService) {}

  ngOnInit(): void {
    this.productService.selectedProduct$.subscribe((value) => {
      this.selectedProduct = value;
    });
  }
Edit the product-list component, inject the product-service, edit the onSelected method, and call the setProduct the method from product service.
  constructor(private productService: ProductService) {}

  onSelectedProduct(product) {
    this.productService.setProduct(product);
  }
Perfect, our components have communication without having dependencies.
Refactor the product-list
We can refactor our code to communicate the services with more steps.
-
Declare behavior subject and methods for product list.
-
Subscribe to the product-list to the service to get the list of products.
Edit the product-service with two new fields for the productList and a new method for sending the list of products.
import { Injectable } from '@angular/core';
import { BehaviorSubject } from 'rxjs';

@Injectable()
export class ProductService {
  private product$ = new BehaviorSubject<any>({});
  selectedProduct$ = this.product$.asObservable();
  private productListBus$ = new BehaviorSubject<any>([]);
  productList$ = this.productListBus$.asObservable();


  setProduct(product: any) {
    this.product$.next(product);
  }

  setProductList(products: any) {
    this.productListBus$.next(products);
  }
}
The app.component
Inject the product service into the constructor, on the ngOnInit lifecycle, subscribe to the method setProductList from the service.
import { OnInit, Component, ViewChild, AfterViewInit } from '@angular/core';
import { ProductListComponent } from './product-list/product-list.component';
import { ProductService } from './product-service.service';

@Component({
  selector: 'my-app',
  templateUrl: './app.component.html',
  styleUrls: ['./app.component.css'],
})
export class AppComponent implements OnInit, AfterViewInit {
  @ViewChild(ProductListComponent) productList;
  sessionId: any;
  selectedProduct: any;

  products = [
    { name: 'Rice', id: 1, price: 200 },
    { name: 'Beans', id: 2, price: 300 },
    { name: 'Bananna', id: 3, price: 400 },
  ];
  constructor(private productService: ProductService) {}

  ngOnInit(): void {
    this.productService.selectedProduct$.subscribe((value) => {
      this.selectedProduct = value;
    });
    this.productService.setProductList(this.products);
  }

  ngAfterViewInit(): void {
    this.sessionId = this.productList.sessionId;
  }
}
We can remove listen to the (onSelected) event from the HTML.
<app-product-list class="card p-2"></app-product-list>ProductList component
Same as app.component, inject the product service in the constructor and subscribe to the productList observable on the ngOnInit lifecycle and assign the productList with the value from the subscription.
Finally, remove the Input and output properties from the productlist.component.ts.
import { Component, Input, OnInit, Output } from '@angular/core';
import { ProductService } from '../product-service.service';

@Component({
  selector: 'app-product-list',
  templateUrl: './product-list.component.html',
  styleUrls: ['./product-list.component.css'],
})
export class ProductListComponent implements OnInit {
  productList = [];

  sessionId = Math.random();

  constructor(private productService: ProductService) {}
  ngOnInit() {
    this.productService.productList$.subscribe((value) => {
      this.productList = value;
    });
  }
  onSelectedProduct(product) {
    this.productService.setProduct(product);
  }
}
Done, our components have clear communication without the use Input and Output :)
Conclusion
In this article, we introduced three ways to communicate components with angular. A component related to one level, like a parent to a child using the input and output decorators, works fine.
Please share the data with a behavior subject service in other scenarios your component expects to use in several places.
If you want to learn more, read the official documentation of angular.
Real Software. Real Lessons.
I share the lessons I learned the hard way, so you can either avoid them or be ready when they happen.
Join 13,800+ developers and readers.
No spam ever. Unsubscribe at any time.