How to Debug NgRx Using REDUX DevTools in Angular

When we work with NgRx, tracing and debugging actions, knowing the current state of our store, and reproducing behavior are very important. We have a great tool to help us as developers debug and analyze our NgRx State: the Redux DevTools.
The Redux DevTools is a Chrome extension that allows us to better debug what is happening in our application. It is easy to configure and gives us the power to change the state or set the app to a specific point in time. One of the great features is time travel, which helps us reproduce any behavior in our apps. Let's start by learning how to install, configure, and use @ngrx/store-devtools.
Install and Configure
We continue with the initial project of NgRx. First, clone the project and switch to the implement-store branch.
git clone https://github.com/danywalls/start-with-ngrx.git
git checkout implement-store
Next, install the package @ngrx/store-devtools from the terminal.
C:\Users\DPAREDES\Desktop\ngrx-lab [final +1 ~0 -0 | +0 ~3 -0 !]> npm i @ngrx/store-devtools

added 1 package, and audited 982 packages in 3s

118 packages are looking for funding
  run `npm fund` for details

found 0 vulnerabilities
To expose information from the state, we need to configure store-devtools in app.config by importing the provideStoreDevtools function. We can set it up with options like the application name, the number of logs, and more.
Here is an example of my configuration::
{
      name: 'nba-app',
      maxAge: 30,
      trace: true,
      connectInZone: true,
}
Read more about config the devtools or official docs
The final code in the app.config.ts looks like:
import { provideRouter } from '@angular/router';
import { routes } from './app.routes';
import { provideStore } from '@ngrx/store';
import { homeReducer } from './pages/home/state/home.reducer';
import { provideAnimationsAsync } from '@angular/platform-browser/animations/async';
import { provideStoreDevtools } from '@ngrx/store-devtools';

export const appConfig = {
  providers: [
    provideRouter(routes),
    provideStore({
      home: homeReducer,
    }),
    provideStoreDevtools({
      name: 'nba-app',
      maxAge: 30,
      trace: true,
      connectInZone: true,
    }),
    provideAnimationsAsync(),
  ],
};
Next, run the app with ng serve -o to start the application. Then, install the Redux DevTools extension in your browser: Chrome or Firefox. After installing, open Chrome DevTools and click on the Redux tab.
The Redux DevTools is ready, so let's take a look at how it helps us trace and debug our application state easily!
Adding More Actions
In the first article, we have a single action [Home Page] Accept Terms. To see the real power of REDUX DevTools and how it traces the full cycle and changes in the state of our application, we are going to create a new action to see how it can record and trace the full cycle.
First, open the home.reducer.ts file. Add another action using the on function to associate an action with the state change. Next, call the createAction function with the new action [Home Page] Reject Terms and change acceptTerms to false.
The code in home.reducer.ts looks like this:
import { createAction, createReducer, on } from '@ngrx/store';
import { initialState } from './home.state';

export const homeReducer = createReducer(
  initialState,
  on(createAction('[Home Page] Accept Terms'), (state) => ({
    ...state,
    acceptTerms: !state.acceptTerms,
  })),
  on(createAction('[Home Page] Reject Terms'), (state) => ({
    ...state,
    acceptTerms: false,
  })),
);
We have two final steps: call the action in the HomeComponent. First, open home.component.ts and create a new method onRejectTerms, using the store to dispatch the [Home Page] Reject Terms action.
  onRejectTerms() {
    this._store.dispatch({
      type: '[Home Page] Reject Terms',
    });
  }
To dispatch the action, add a new button in the template to call the action.
@if(!$acceptTerms()) {
    <h3>Are you agree to use to use NgRx?</h3>
    <input (change)="onChange()" [value]="$acceptTerms()" type="checkbox"  >
} @else {
   <h2>Thanks for love NgRx🎉🥳</h2>
  <button mat-button   (click)="onRejectTerms()">Reject Terms</button>
}
Perfect, we have everything ready to see how REDUX DevTools helps us to debug our applications.
Tracing Actions with REDUX DevTools
Open Chrome DevTools again, click on the Redux tab, and start interacting with the application. Every triggered action will appear in the action log. For example, you will see actions logged for initializing the store and individual actions as you interact with the app. The action tab will describe the type of action and show the raw action type.
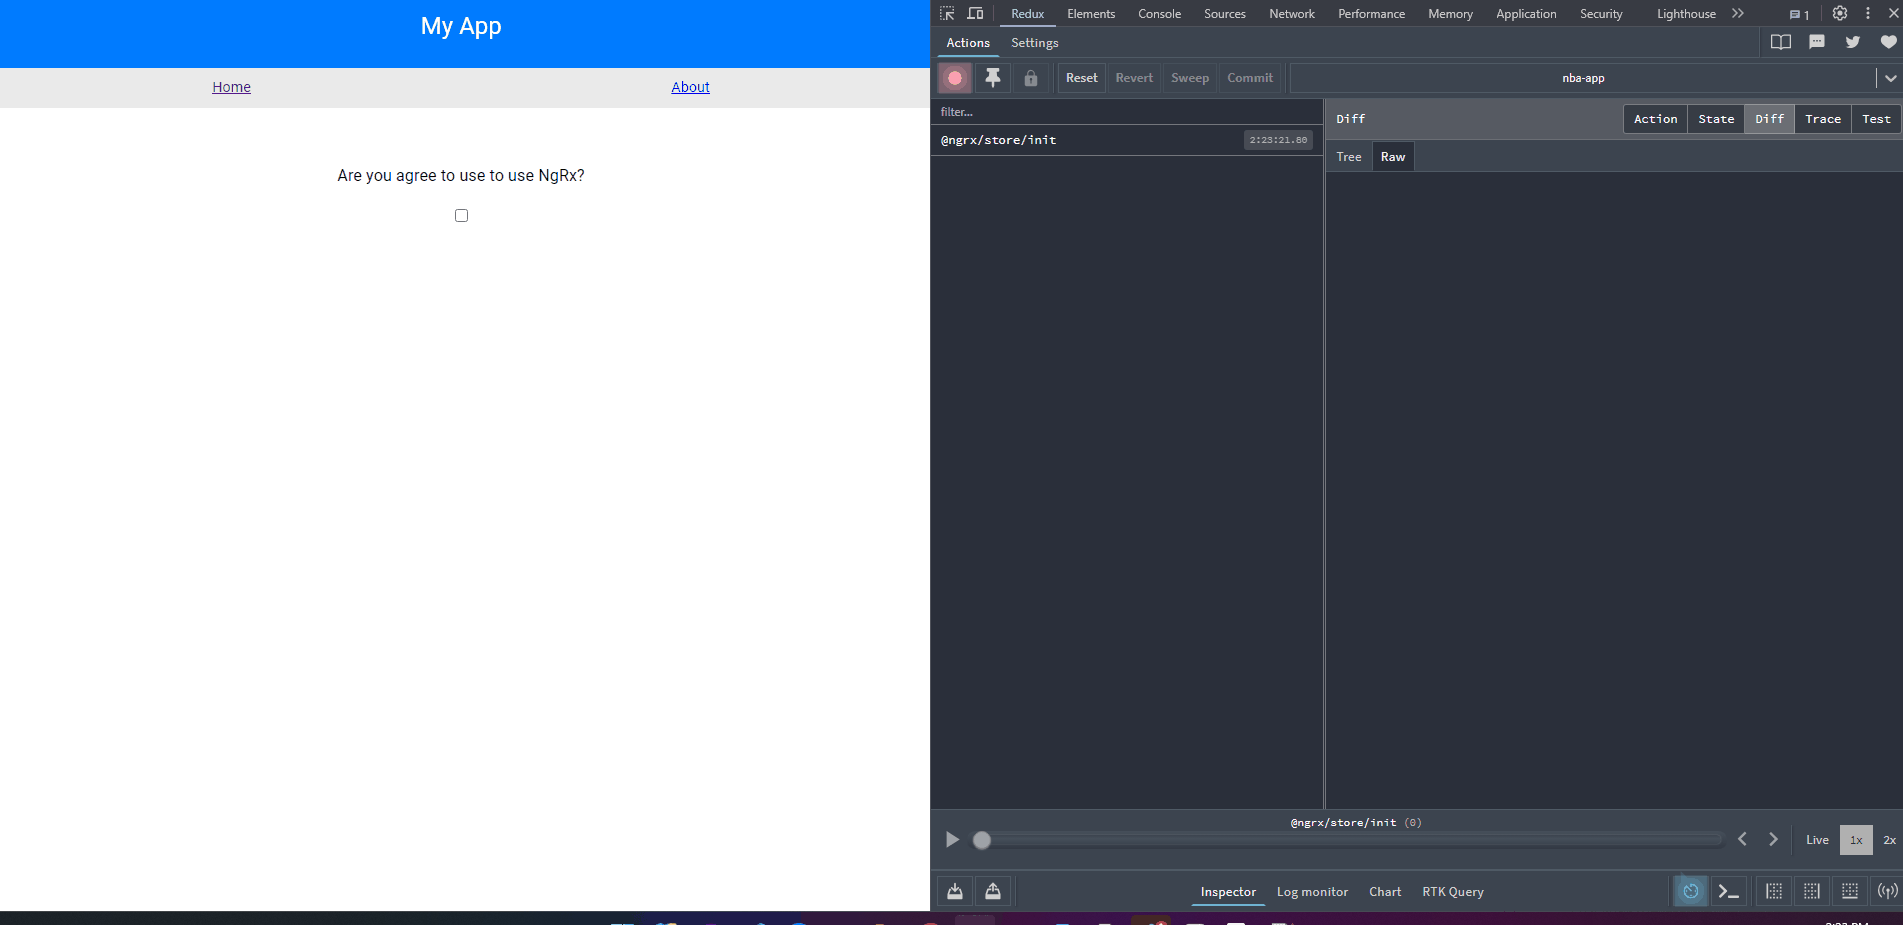
We can also click on the state tab to see changes in the state, move back and forth between actions, replay the application state by clicking the play button, pause the logs, clear the commit, trigger actions manually, and more. Check out the Redux Devtool tutorials from Monsterlessons.
Conclusion
We learned how easy is to use Redux DevTools with NgRx for debugging and analyzing application state. Playing with installation, configuration, and basic usage of @ngrx/store-devtools, including setting up actions and tracing and debug application state effectively.
Frequently Asked Questions
How do I set up Redux DevTools with NgRx in Angular?
To set up Redux DevTools with NgRx, first install the @ngrx/store-devtools package, then import and call provideStoreDevtools in your app configuration file alongside provideStore. You can pass configuration options like maxAge to limit the number of stored actions, and name to label your app in the DevTools panel.
What does the time travel feature in Redux DevTools let you do?
The time travel feature in Redux DevTools allows you to step backwards and forwards through every action that was dispatched in your application. By jumping to a specific point in the action history, you can reproduce a past state of your store exactly as it was, which makes it much easier to debug issues that depend on a particular sequence of events.
Should I disable NgRx store devtools in production builds?
Yes, you should disable or limit the Redux DevTools in production to avoid exposing your application state to end users and to avoid the performance overhead of tracking every action. You can do this by conditionally passing logOnly: environment.production or setting maxAge to a low number in the provideStoreDevtools configuration.
What information can I see in the Redux DevTools when working with NgRx?
Redux DevTools shows you a log of every dispatched action with its type and payload, the resulting state snapshot after each action, and a diff view showing exactly what changed in the store. You can also use the state tab to inspect the full current store, and the trace option can show you a stack trace pointing to where the action was dispatched in your code.
Related Articles
Angular Router URL Parameters Using NgRx Router Store
When we build apps with state, the entry point is key to initialize our state for our components, but sometimes, we have requirements to preserve application state within the URL to allow users to bookmark or share specific application states, with t...
How to Handle Side Effects in Angular Using NgRx Effects
Side-effects! They are one of the most common tasks in our applications. In Angular, but build application if we don't take care the component ends with a lot of responsability, like get, process and render the data. But in Angular most of time when ...
When and Why to Use REDUX NgRx in Angular
In a previous article, I wrote about managing the state in Angular by using Services, but when the application increases in size and needs to track and handle a large state, it becomes a bit complex and not easy to manage. For example, when we have m...
How To Debug Angular Applications Easy
As developers, we use a lot of our coding time to fix bugs. Debugging helps us find and remove errors in software development. But sometimes, finding a bug takes longer than fixing it. That's when we need to learn some ways to debug our apps. Let's i...
Real Software. Real Lessons.
I share the lessons I learned the hard way, so you can either avoid them or be ready when they happen.
Join 13,800+ developers and readers.
No spam ever. Unsubscribe at any time.