Building a Local AI Chatbot with Gemini Nano, Chrome Canary, Angular, and Kendo AI Prompt
The race for AI continues. Alternatives like Ollama help us interact with AI models on our machines. However, the Chrome and Google teams are moving one step forward by enabling Chrome with Gemini Nano running in our browsers.
Note this API is experimental and works in Chrome Canary
The Chrome team is working to have a small LLM in our browser to perform common and simple tasks without needing an external API like OpenAI or running Ollama to build and interact with an LLM. The API helps us with tasks like summarizing, classifying, and rephrasing. We can read about the API, but a scenario is the best way to learn and see it in action.
Scenario
We work at a company that wants to create a proof of concept (POC) to interact with common tasks in an LLM model. Our goal is to have a chat where users can ask questions or choose from a list of common questions.
How can we do it?
-
Use Angular 18 and Kendo AI Prompt to build a clean interface.
-
Use Gemini Nano in Chrome Canary LLM interaction.
Let's get started!
Enable Gemini Nano in Chrome Canary
First, download and install Chrome Canary https://www.google.com/chrome/canary/ after that enable the Prompt API for Gemini Nano.
Next, activate Gemini Nano in the browser with the following flags.
-
chrome://flags/#prompt-api-for-gemini-nano -
chrome://flags/#optimization-guide-on-device-model
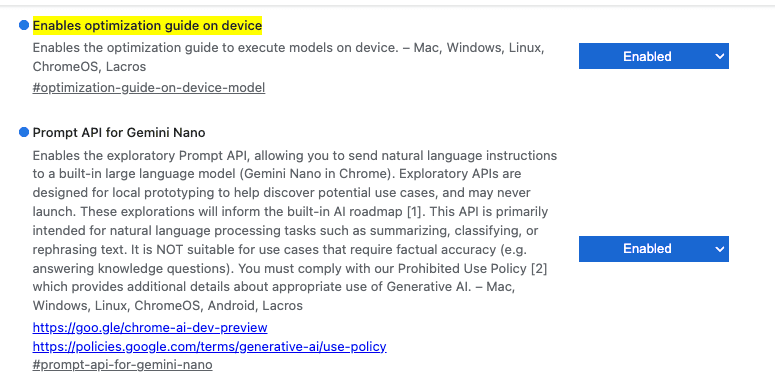
After activating these options, remember to restart Chrome.
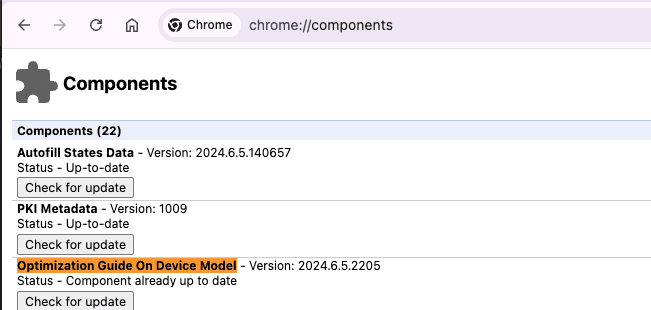
The Gemini Nano takes time to download. To confirm, open Chrome Canary and go to chrome://components. Check if the Optimization Guide On Device Model has version 2024.6.5.2205.
Note: Thanks to @Bezael Pérez feedback, be sure to have at least 2GB of Free space in your machine
After that, we are ready to start coding! Let's go!
Set Up the Project
First, set up your Angular application with the command ng new gemini-nano-angular
ng new gemini-nano-angular
cd gemini-nano-angular
npm install
Kendo UI provides a schematics command for easy registration of its Angular Conversational UI in our project.
I'm using Kendo UI it is 30-day FREE trial. Free technical support and training during your trial and no credit card required.
ng add @progress/kendo-angular-conversational-ui
ℹ Using package manager: npm
✔ Found compatible package version: @progress/kendo-angular-conversational-ui@16.3.0.
✔ Package information loaded.

The package @progress/kendo-angular-conversational-ui@16.3.0 will be installed and executed.
Would you like to proceed? Yes
✔ Packages successfully installed.
UPDATE package.json (1663 bytes)
UPDATE angular.json (2893 bytes)
✔ Packages installed successfully.
UPDATE src/main.ts (295 bytes)
UPDATE tsconfig.app.json (455 bytes)
UPDATE tsconfig.spec.json (461 bytes)
UPDATE angular.json (2973 bytes)
Perfect, we have all things configured, let's start to create our chat prompt interface with Kendo AI Prompt.
Using AI Prompt
We want to build a clean interface to interact with the LLM, so I choose to use AI Prompt. The AI Prompt is a component of Kendo UI that allows us to create a stylish interface for interacting with the LLM. It also includes common actions like copy, retry, or rate the answer, and more.
II highly recommend checking out the official docs with great demos.
The kendo-aiprompt comes with a set of child components and properties. First, open the app.component.html, remove the default HTML markup, and add two components: kendo-aiprompt-prompt-view and kendo-aiprompt-output-view.
Remember to add the
AIPromptModulein the imports sections.
We customize the kendo-aiprompt-view title with the property buttonText set to "☺️ Ask your question".
 <h2>Free Local Gemini</h2>
<kendo-aiprompt>
  <kendo-aiprompt-prompt-view
    [buttonText]="'☺️ Ask your question'"
 />
  <kendo-aiprompt-output-view/>
</kendo-aiprompt>
Save changes and run ng serve -o and tada!! 🎉 we have our clean chatbot UI ready!
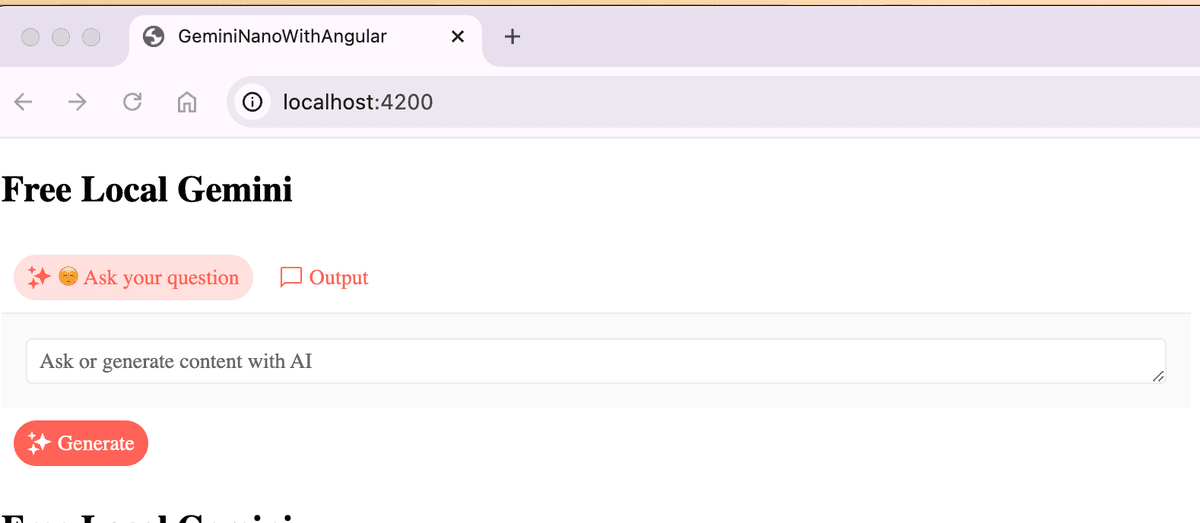
It's time to customize the kendo-aiprompt to allow the user to change the activeView, set default suggestions, and, of course, set promptOutputs from the LLM and handle the promptRequest. Let's do it!
Customize AIPrompt
Open app.component.ts. Here, we need to perform the following actions. First, we add the properties. These properties will be bound to the <kendo-aiprompt> component to customize and react to changes.
-
view: to switch between views. -
promptOutputs: to get the output from LLM. -
suggestions: a list of default text suggestions.
Last, create an empty method onPromptRequest to get the text from kendo-aiprompt. The final code looks like this:
export class AppComponent {

  public view: number = 0;
  public promptOutputs: Array<PromptOutput> = [];

  public suggestions: Array<string> = [
    'Tell me a short joke',
    'Tell me about Dominican Republic'
  ]


  public onPromptRequest(ev: PromptRequestEvent): void {
      console.log(ev)
  }
}
Next move to the app.component.html, and bind kendo-aiprompt with the properties and method, the final code looks like:
<h2>Free Local Gemini</h2>
<kendo-aiprompt
  [(activeView)]="view"
  [promptSuggestions]="suggestions"
  [promptOutputs]="promptOutputs"
  (promptRequest)="onPromptRequest($event)"
>
  <kendo-aiprompt-prompt-view
    [buttonText]="' ☺️ Ask your question'"
 />

  <kendo-aiprompt-output-view/>
</kendo-aiprompt>
We have the component ready, but what about LLM and Gemini ?, well we need to create a service to interact with the new API window.ai.
Using window.ai API
First, create a service using the Angular CLI ng g s services/gemini-nano and open the gemini-nano.service.ts file.
Next, declare the private variable system_prompt. It adds extra information to the prompt for the LLM.
import {Injectable} from '@angular/core';

@Injectable({providedIn: 'root'})
export class GeminiNanoService {

  #system_prompt = 'answer in plain text without markdown style'

}
Next, create the method generateText with a string as a parameter. This method will return a promise from the window.ai API. Wrap the body of the method with a try-catch block to handle cases where the user is not using Chrome Canary.
The window.ai API provides a set of methods, but in this example, I will use createTextSession to enable an LLM session. It returns an instance to interact with the LLM.
Create a new variable textSession and store the result from the window.ai.createSession method.
try {
     const textSession = await window.ai.createTextSession();

   }
   catch (err){
     return 'Ups! please use chrome canary and enable IA features'
   }
Oops, I can't access window.ai.createTextSession. I received the error: Property 'ai' does not exist on type 'Window & typeof globalThis'.
The error: Property does not exist on type Window & typeof globalThis

When working with the Window type, the definition is in lib.dom. However, since ai is not defined there, you will encounter the TS2339: Property ai does not exist on type Window & typeof globalThis error.
But how do you fix this? Just follow these steps:
-
Create an
index.d.tsfile in thesrc/typesdirectory. -
Export and declare the
globalWindowinterface, then add the necessary properties. In my case, I declare only the methods needed for this example.
What are the methods of window.ai? Open the developer tools in Chrome Canary and type window.ai. It will return a list of methods.
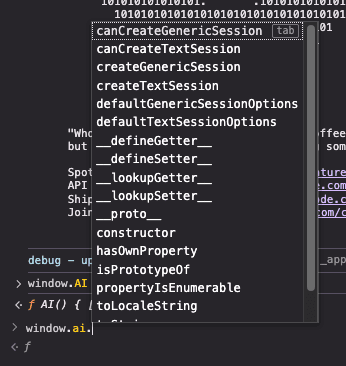
We define an interface for each method and type declaration. To save you time, here is the complete AI API type declaration.
export {};

declare global {
  interface AISession {
    promptStreaming: (prompt: string) => AsyncIterableIterator<string>;
    prompt: (prompt: string) => Promise<string>;
    destroy: () => void;
  }
  interface AI {
    canCreateGenericSession: () => Promise<string>;
    canCreateTextSession: () => Promise<string>;
    createGenericSession: () => Promise<AISession>;
    createTextSession: () => Promise<AISession>;
    defaultGenericSessionOptions: () => object;
    defaultTextSessionOptions: () => object;
  }
  interface Window {
    ai: AI
  }
}
Finally, add a reference to the file in the tsconfig.json file.
  "typeRoots": [
      "src/types"
    ]
Ok, let's continue working with the window.ai api.
The textSession object provides the method prompt to interact. Before sending the user's question, we combine it with the system prompt to improve our query. We then send the combined prompt to the session.prompt method and return the promise.
The final code looks like this:
import {Injectable} from '@angular/core';

@Injectable({providedIn: 'root'})
export class GeminiNanoService {

  #system_prompt = 'answer in plain text without markdown style'

 async generateText(question: string): Promise<string> {
   try {
     const textSession = await window.ai.createTextSession();
      const prompt_question = `${question} ${this.#system_prompt}`;
     return await textSession.prompt(prompt_question);
   }
   catch (err){
     return 'Ups! please use chrome canary and enable IA features'
   }

  }
}
We have our service ready so it time to connect with the kendo-ai prompt to make it interactive.
Interact with LLM
We are in the final step, so we only need to make a small changes in the app.component.ts, first inject the GeminiNanoService.
Next, we make a change in the onPromptRequest, by call the service method generateText pass the prompt and wait for the promise return, in the them method, we need to get the response and create a PromptOut object and unshift to the promptOutputs array and switch to the view one.
The final code looks like:
import {Component, inject} from '@angular/core';
import { RouterOutlet } from '@angular/router';
import {GeminiNanoService} from "./services/gemini-nano.service";
import {
  AIPromptModule, PromptOutput,
  PromptRequestEvent
} from "@progress/kendo-angular-conversational-ui";

@Component({
  selector: 'app-root',
  standalone: true,
  imports: [RouterOutlet, AIPromptModule],
  templateUrl: './app.component.html',
  styleUrl: './app.component.css'
})
export class AppComponent {

  public view: number = 0;
  public promptOutputs: Array<PromptOutput> = [];

  public suggestions: Array<string> = [
    'Tell me a short joke',
    'Tell me about dominican republic'
  ]
    private nanoService = inject(GeminiNanoService)

  public onPromptRequest(ev: PromptRequestEvent): void {
    this.nanoService.generateText(ev.prompt).then((v) => {
      const output: PromptOutput = {
        id: Math.random(),
        prompt: ev.prompt,
        output: v,
      }
      this.promptOutputs.unshift(output);
      this.view = 1;
    }

  )
  }

}
Save the changes, and now we can interact with Gemini Nano in Chrome Canary!
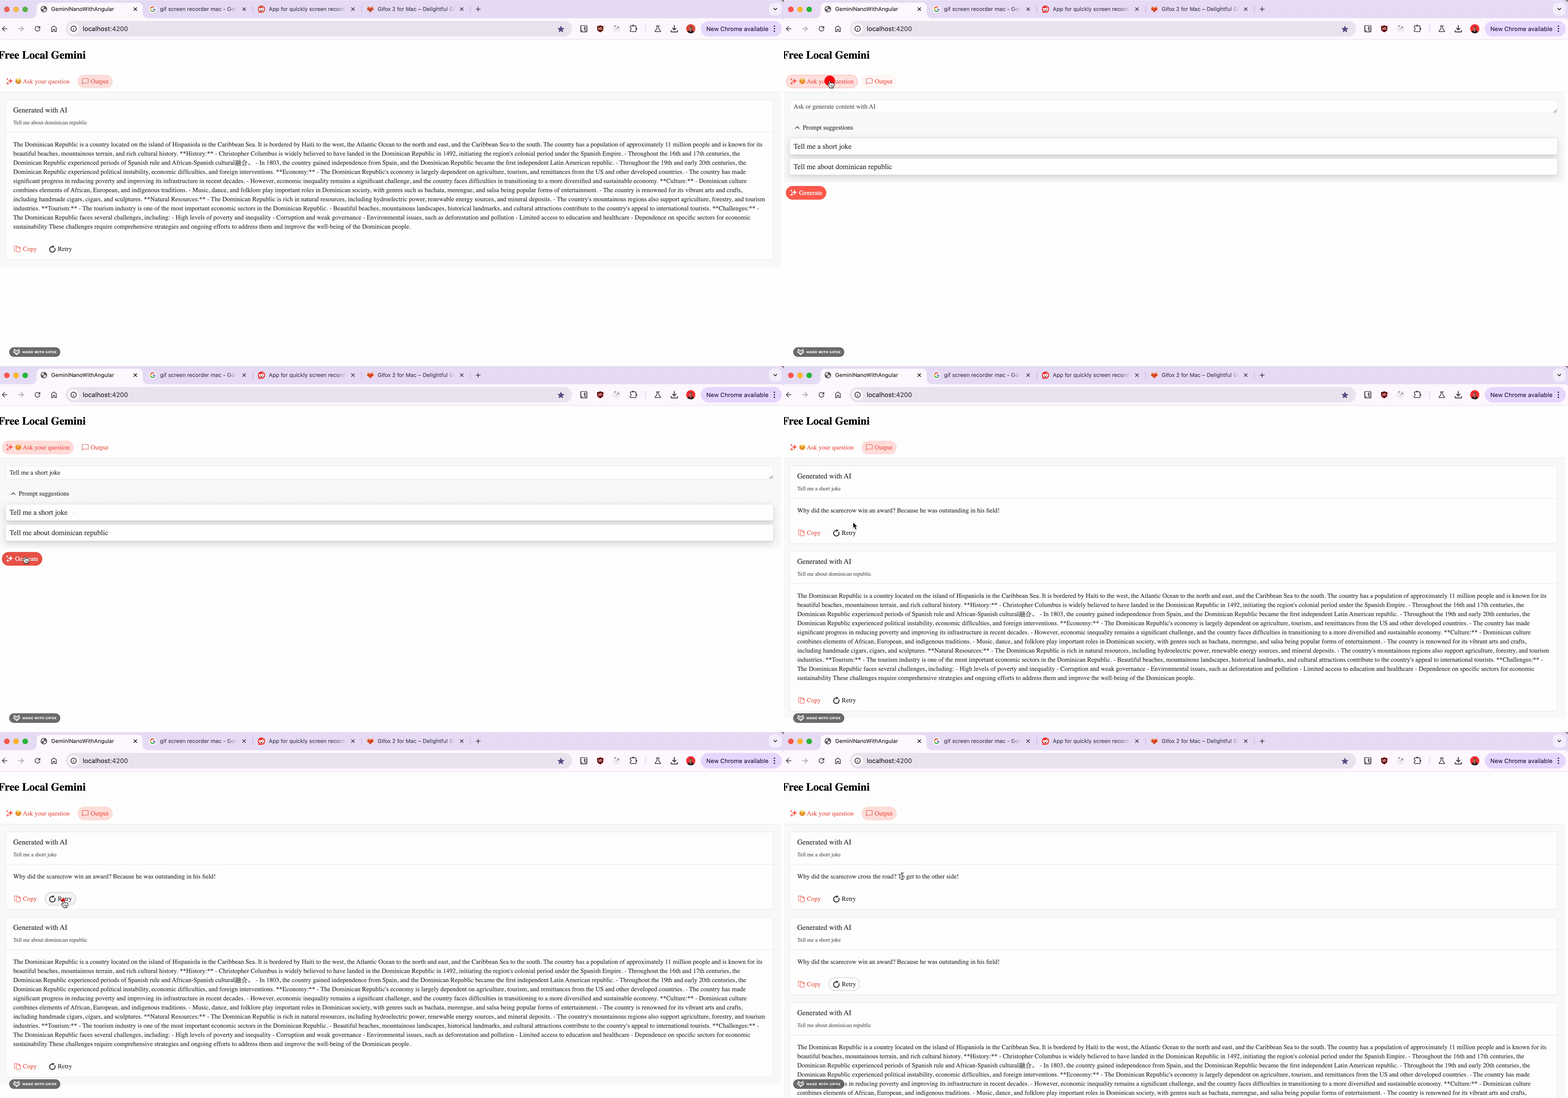
Conclusion
We learned how to use Gemini Nano, an experimental local LLM running within Chrome Canary. We build a chat application with Angular 18 and Kendo UI Conversational AI Prompt and run our locally-run chatbot with just a few lines of code.
The fun doesn't stop here. I highly recommend checking out the official website to learn more about the AI API.
Real Software. Real Lessons.
I share the lessons I learned the hard way, so you can either avoid them or be ready when they happen.
Join 13,800+ developers and readers.
No spam ever. Unsubscribe at any time.