---
title: "Create ChatBot  with  Gemini, Kendo  UI, and Angular 17"
date: "2024-01-24"
slug: "create-your-personalized-gemini-chat-with-kendo-ui-conversational-ui-and-angular"
author: "Dany Paredes"
canonical: "https://danywalls.com/create-your-personalized-gemini-chat-with-kendo-ui-conversational-ui-and-angular"
description: "When I see many chats connected with AI, a friend once said it's difficult, but it isn't. Today, I want to demonstrate how easy it is to build your own chat connected with AI and a nice interface using just a few lines of code.\nwe'll learn how to cr..."
---

When I see many chats connected with AI, a friend once said it's difficult, but it isn't. Today, I want to demonstrate how easy it is to build your own chat connected with AI and a nice interface using just a few lines of code.

![](/images/posts/create-your-personalized-gemini-chat-with-kendo-ui-conversational-ui-and-angular/5c5c7cd3-e70c-4_82471.gif)

we'll learn how to create an Angular application using the Gemini library and integrate it with [Kendo Conversational UI](https://www.telerik.com/kendo-angular-ui/components/conversational-ui/) for an impressive user interface.

How long will it take? Surprisingly, it can be done fast. Let's get started!

## Setup Project

First, create the Angular application and install the Gemini library using Angular CLI with the command `ng new conversional-with-gemini`. This generates a new, empty Angular project.

```bash
ng new conversional-with-gemini
```

Navigate to the directory and generate a Gemini-client service using the CLI generator by executing the following command:

```bash
ng g s services/gemini
CREATE src/app/services/gemini.service.spec.ts (404 bytes)
CREATE src/app/services/gemini.service.ts (150 bytes)
```

In Angular 17, since we don't have the environment file, create it using the command `ng generate environments`.

```bash
ng generate environments
```

## Using Gemini

To use Gemini, we need to utilize the Gemini SDK with a key. First, install the Gemini SDK in the project by running the following command:

```xml
npm i @google/generative-ai
```

Next, obtain your API key from [https://ai.google.dev/](https://ai.google.dev/), copy it, and store the value in the environment.ts file, like this:

```bash
export const environment = {
  geminy_key: "YourAmazingKey"
};
```

We have the key and the SDK installed; now it's time to use them in our Gemini client service. Let's do it!

## Using Gemini SDK

We're going to use the Gemini SDK in the `gemini-client` service, creating an instance of Google AI with the key and generating a model, in our case, 'gemini-pro', which returns an instance of the model ready to work.

In our case, we want to use the model based on a prompt. For my specific needs, I want it to function like an Angular developer with experience in Kendo UI for Angular.

So my prompt will be like:

> You are an expert in the Kendo UI library for Angular, provide a real-world scenario and how this product, helps to solve, with angular code examples and links for resources

The code must look like:

```typescript
import { Injectable } from '@angular/core';
import { GoogleGenerativeAI } from '@google/generative-ai';
import { environment } from '../../environments/environment';

@Injectable({
  providedIn: 'root',
})
export class GeminiService {
  #generativeAI = new GoogleGenerativeAI(environment.geminy_key);

  #prompt =
    'You are an expert in the Kendo UI library for Angular, provide a real-world scenario and how this product ' +
    'helps to solve, with angular code examples and links for resources';

  #model = this.#generativeAI.getGenerativeModel({
    model: 'gemini-pro',
  });
  
}
```

Now it's time to generate the content using the model. First, create a method called `generate` with the parameter `textInput`. Since the generateContent code is asynchronous, the signature of the `generate` method must also be async.

First, we define the `parts` to set up the content to generate, using the `prompt` and the `textInput` from the user. This helps provide context for the model. Next, we obtain the `modelResult` from the model, which returns several properties. In our case, the most important one is the `response`. This object includes the function `text` to obtain the raw value. To test our code, we can print it in the console using `console.log()`.

> We use try catch to handle any error in the generateContent request.

```typescript
 async generate(textInput: string) {
    try {
      if (text) {
        const parts = [
          {
            text: this.#prompt,
          },
          { text: textInput }
        ];

        const modelResult = await this.#model.generateContent({
          contents: [{ role: 'user', parts }],
        });
        const response = modelResult.response;
        const text = response.text();
         console.log(text)
      }
    } catch (e: any) {
      console.log(e);
    }
  }
```

To utilize our service, follow these steps: inject the `GeminiClientService` into the `AppComponent.ts`, add a new method called `getAnswer`, and then call the `generate` method from `gemeniService`.

```typescript
export class AppComponent {
  geminiService = inject(GeminiService)

  async getAnswer(text: any) {
    await this.geminiService.generate(text);
  }

}
```

In the HTML markup, add an `input` with a template reference `#inputText`. On the `button`, call the `getAnswer` method.

```xml
<input #userInput><button (click)="getAnswer(userInput.value)">Generate</button>
```

Save the changes and see our "Kendo IA power by Gemini"! 🎉😎

![](/images/posts/create-your-personalized-gemini-chat-with-kendo-ui-conversational-ui-and-angular/9d52e015-802d-4_82472.gif)

Alright, it works, but it doesn't look very nice. Let's make it visually appealing using Kendo Conversational UI.

## Using Conversational UI

To begin, we need to install the Kendo UI for Angular Conversational UI to work using schematics:

```bash
ng add @progress/kendo-angular-conversational-ui
```

Import the `ChatModule` in the imports section of the `app.component.ts`, as it provides the `kendo-chat` component.

```bash

@Component({
  selector: 'app-root',
  standalone: true,
  imports: [CommonModule,   ChatModule],
  templateUrl: './app.component.html',
  styleUrl: './app.component.scss',
})
export class AppComponent {
```

Let's start to do the magic in the `gemini.service.ts`, it will provide signals to sync the Gemini answer with the kendo-chat the user, and the messages.

We need to declare two users for the chat: one will be the `kendoIA`, and the other will be the `user`, like me. Each user must have a unique ID. To display an appealing user image, we can use assets images.

> I'm using [crypto.randomUUID()](https://developer.mozilla.org/en-US/docs/Web/API/Crypto/randomUUID) to generate unique id.

```javascript
  readonly #kendoIA: User = {
    id: crypto.randomUUID(),
    name: 'Kendo UI',
    avatarUrl: './assets/kendo.png',
  };

  public readonly user: User = {
    id: crypto.randomUUID(),
    name: 'Dany',
    avatarUrl: './assets/dany.jpg',
  };
```

Declare a signal `$messages` with an array of `Message`, and initialize with the initial message:

```javascript
  $messages = signal<Message[]>([{
          author: this.#kendoIA,
          timestamp: new Date(),
          text: 'Hi! 👋 how I can help you with Kendo ?'
  }]);
```

The `kendo-chat` returns a `SendMessageEvent`, which provides all information about the message from the UI, such as the user, message, and more. We update the generate method with the signature of `SendMessage` and update the initial logic reading the `message.text`.

```javascript
async generate(textInput: SendMessageEvent) {
    try {
      if (textInput.message.text && this.#model) {
```

Next, update the `messages` signal using the update method, incorporating the new message and the components needed to read the text from `textInput.message.text`.

```javascript
     this.$messages.update((p) => [...p, textInput.message]);
        const parts = [
          {
            text: this.#prompt,
          },
          { text: textInput.message.text },
        ];
```

Create a new message with the response from the model, assign the `author`: `this.#kendoIA` and update again the messages.

```javascript
 const message = {
          author: this.#kendoIA,
          timestamp: new Date(),
          text,
        };

        this.$messages.update((p) => [...p, message]);
```

The final code looks like this:

```javascript
async generate(textInput: SendMessageEvent) {
    try {
      if (textInput.message.text && this.#model) {
        this.$messages.update((p) => [...p, textInput.message]);
        const parts = [
          {
            text: this.#prompt,
          },
          { text: textInput.message.text },
        ];

        const result = await this.#model.generateContent({
          contents: [{ role: 'user', parts }],
        });
        
        const response = result.response;
        const text = response.text();

        const message = {
          author: this.#kendoIA,
          timestamp: new Date(),
          text,
        };

        this.$messages.update((p) => [...p, message]);
      }
    } catch (e: any) {
      console.log(e);
    }
  }
```

## Connect the Kendo Chat with Signals

This is the enjoyable part of connecting with signals! We will utilize the `$messages` and `user` from the Gemini service. First, declare the variables in the `app.component.ts`.

```typescript
export class AppComponent {

  geminiService = inject(GeminiService)
  user = this.geminiService.user;
  messages = this.geminiService.$messages

  async generate(event: SendMessageEvent) {
    await this.geminiService.generate(event);
  }
}
```

In the template, add the `<kendo-chat>` and bind the `user` property. Next, read the `messages` (with parentheses) and bind the `sendMessage` to the previously defined `generate` method.

Since we want to display both the `avatar` and the `text`, we modify the default template using the `kendoChatMessageTemplate` directive to gain access to the message variable.

The final markup looks like:

```xml
  <kendo-chat [user]="user" [messages]="messages()" (sendMessage)="generate($event)" width="450px">
    <ng-template kendoChatMessageTemplate let-message>
      <div>
      {{ message.text }}
      {{message.avatar}}
      </div>
  </ng-template>
```

Save the changes, and voilà! You now have Gemini working with conversational UI and a sleek UI!
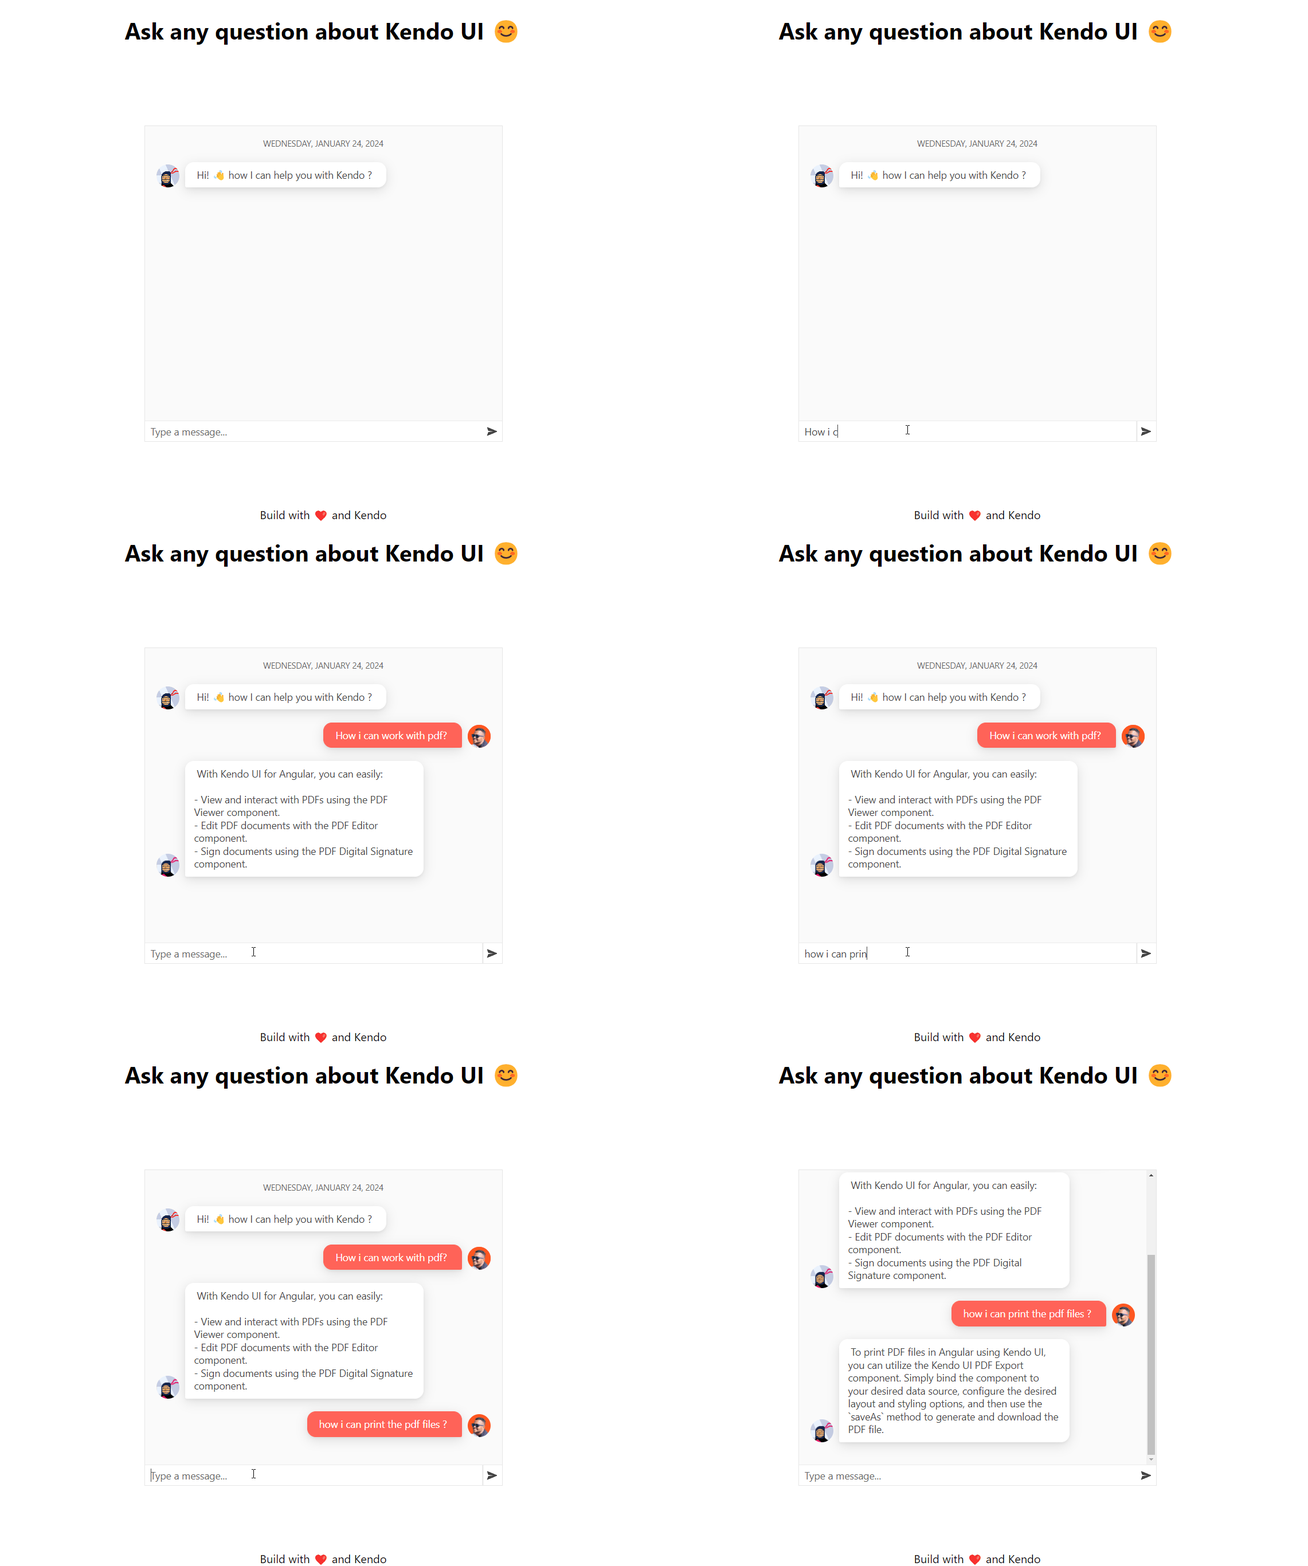
![](/images/posts/create-your-personalized-gemini-chat-with-kendo-ui-conversational-ui-and-angular/5c5c7cd3-e70c-4_82472.gif)

It works but after showing @[Jörgen de Groot](@Alt148) my demo of my first chat using [Gemini and the Conversational UI](https://www.danywalls.com/create-your-personalized-gemini-chat-with-kendo-ui-conversational-ui-and-angular), He asked how to maintain the chat history and context while avoiding the need to send the prompt every time.

### The Context and Tokens

The first approach of sending the prompt repeatedly incurs an expense and does not support maintaining the initial context or preserving the conversation history.

Gemini offers a chat feature that collects our questions and responses, enabling interactive and incremental answers within the same context. This is perfect for our Kendo ChatBot, so let's implement these changes.

## The Chat Session

In our first approach we play with the geminy `model` to generate content. This time, we will employ the `startChat` method with the model to obtain a `ChatSession` object, which offers a history and initial context with the `prompt`.

The Gemini model offers an option to initiate a `ChatSession`, where we establish our initial prompt and conversation using the `startChat` feature. The `ChatSession` object contains a `sendMessage` method, which enables us to supply only the second prompt from the user.

First, declare a new object `chatSession` with the initial history, which should include the initial `prompt` and the initial answer, for example:

```typescript
 #chatSession = this.#model.startChat({
    history: [
      {
        role: 'user',
        parts: this.#prompt,
      },
      {
        role: 'model',
        parts: "Yes, I'm a Angular expert with Kendo UI",
      },
    ],
    generationConfig: {
      maxOutputTokens: 100,
    },
  });
```

Our next step is to use the `chatSession` instead of directly sending the parts and `user` role to the `model` each time:

```typescript
     const result = await this.#model.generateContent({
          contents: [{ role: 'user', parts }],
        });
```

Replace the `model` with the `chatSession` and utilize the `sendMessage` method:

```typescript
 const result = await this.#chatSession.sendMessage(
          textInput.message.text,
       );
```

Done! 🎉 Our chatbot now supports history and continuous interaction, without sending the full prompt every time, saving our tokens 😊😁

Checkout the demo: 👇

![](/images/posts/create-your-personalized-gemini-chat-with-kendo-ui-conversational-ui-and-angular/3770e925-e197-4_82472.gif)

## Recap

We learned how to combine the power of Gemini with Angular and integrate it with [Angular Conversational UI](https://www.telerik.com/kendo-angular-ui/components/conversational-ui/) for a user-friendly interface. We also demonstrated how to make the interface visually appealing using the [Angular Conversational UI](https://www.telerik.com/kendo-angular-ui/components/conversational-ui/).

We added history support to our chat, saving tokens and enhancing user experience. This improves Gemini Chatbot functionality by maintaining chat history and context, preventing the need to resend initial prompts.

Using the chat feature, which collects questions and responses, for interactive and incremental answers using `ChatSession` and provides a better user experience, and also saves tokens by not sending the full prompt every time. 💰🎉

* Model: [https://github.com/danywalls/conversational-with-gemini](https://github.com/danywalls/conversational-with-gemini)
    
* [Kendo UI Angular Conversational UI](https://www.telerik.com/kendo-angular-ui/components/conversational-ui/)

